Help & User Guide
Naming your movies, TV shows, music and photos so posters, album covers and details appear automatically, watching on your TV and listening in your car, and looking after your myUSBdrive, from drive mirroring and remote access to sorting out anything that isn't working.
Choose a topic, or search for what you need.
Something not working?
Pick what's happening to open its guide. Your files stay safe on your USB drive through every one of these.
| myusb.local won't open | Get your myUSBdrive working again with simple checks for your Wi-Fi, computer and network settings. | Open guide |
|---|---|---|
| You've forgotten your password | Reset your app password by reinstalling the SD card, without affecting the files stored on your USB drive. | Open guide |
| Your drive isn't showing up | Find out why your USB drive isn't appearing and how to get it recognised again. | Open guide |
| A video won't play | Understand which video formats need converting and how to play them in your browser. | Open guide |
| Your web address shows Error 1033 | Troubleshoot remote access problems and restore your personal myusb.cloud address. | Open guide |
| It says your device isn't connected | Reconnect your drive to your subscription in a minute, keeping your web address. | Open guide |
| The shared folder stopped opening | Open your drives as a folder on Windows, Mac or Linux, and fix it after a rename. | Open guide |
Can't find what you're looking for? Email me at support@myusb.cloud and I'll help you sort it out.
Help Make your library look great
Movies
Get posters and details automatically
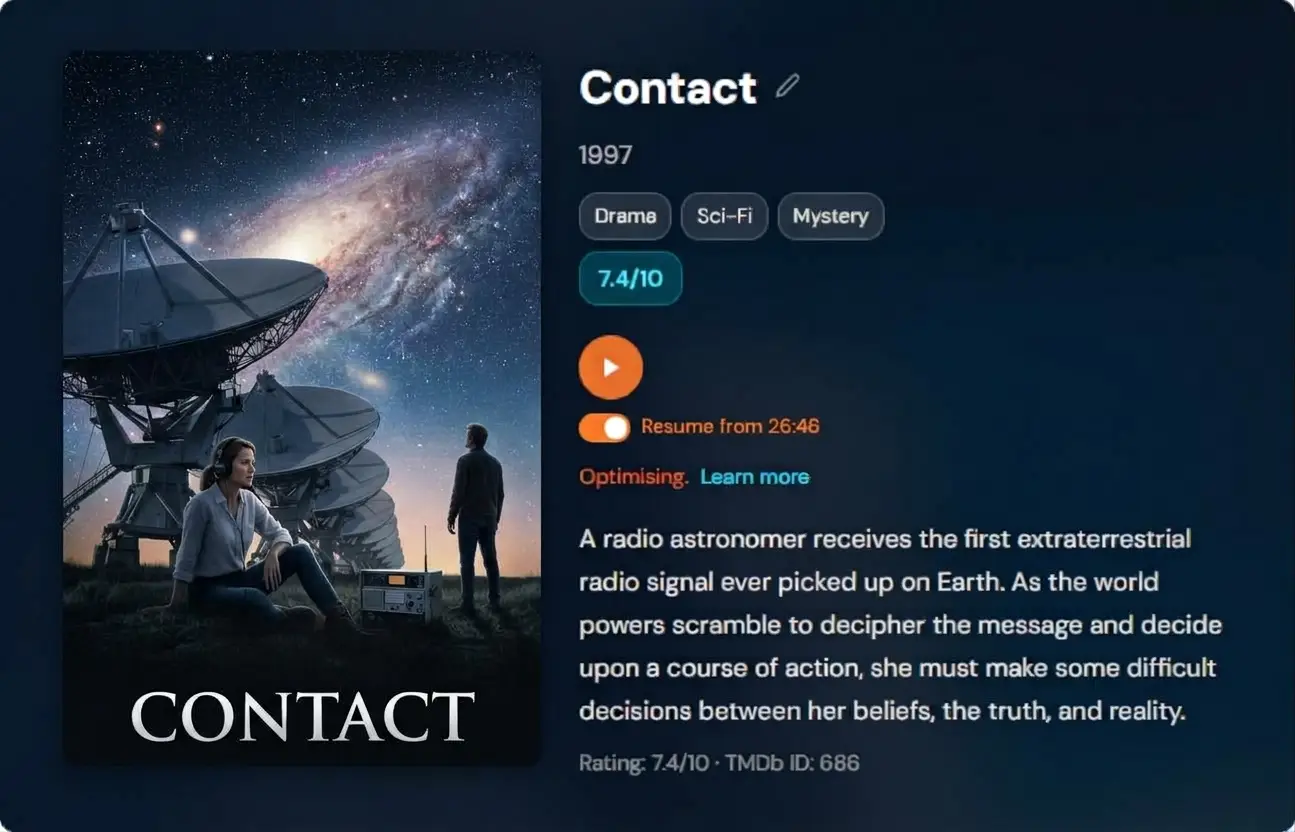
myUSBdrive reads each movie's filename, works out the title and year, and looks it up on The Movie Database to pull the poster, genre, rating and description.
The one name that always works
Title (Year).extFor example:
The Shawshank Redemption (1994).mkv
Interstellar (2014).mp4
Blade Runner (1982).mp4
Why the year matters: it tells remakes apart, like the 1982 and 2017 versions of Blade Runner. If the year is missing or wrong, the app still tries without it, but the poster may be for the wrong version.
What the app cleans up for you
Files downloaded with messy names usually still work, because the app tidies them automatically:
- Dots, underscores and hyphens become spaces, so
The.Matrix.1999.avireads as The Matrix, 1999. - Quality and format tags are stripped:
1080p,2160p,4K,BluRay,WEBRip,x264,x265,HEVC,AAC,AC3,DTSand more. - Years from 1920 to 2039 are recognised.
So Interstellar.2014.1080p.BluRay.x264.mkv still matches, but Interstellar (2014).mp4 is cleaner and more reliable.
Title (Year) and it almost always sorts it.For the smoothest playback
Use .mp4 (H.264 video with AAC audio) where you can. It plays instantly in any browser and on any phone. Files in .mkv, .avi or .wmv, or with HEVC/H.265, AC3 or DTS audio, have to be converted on the fly. That still works, but it asks more of your Raspberry Pi.
Home videos
Your own clips won't be on any database. Use Mark as home movie in the app so it stops searching and shows a clean tile. It's handy too if a personal clip keeps matching a real film by mistake.
Poster-eligible file types: mp4, mkv, avi, mov, wmv, flv, webm, m4v, ts, ogv.
Help Make your library look great
TV series
One folder per show
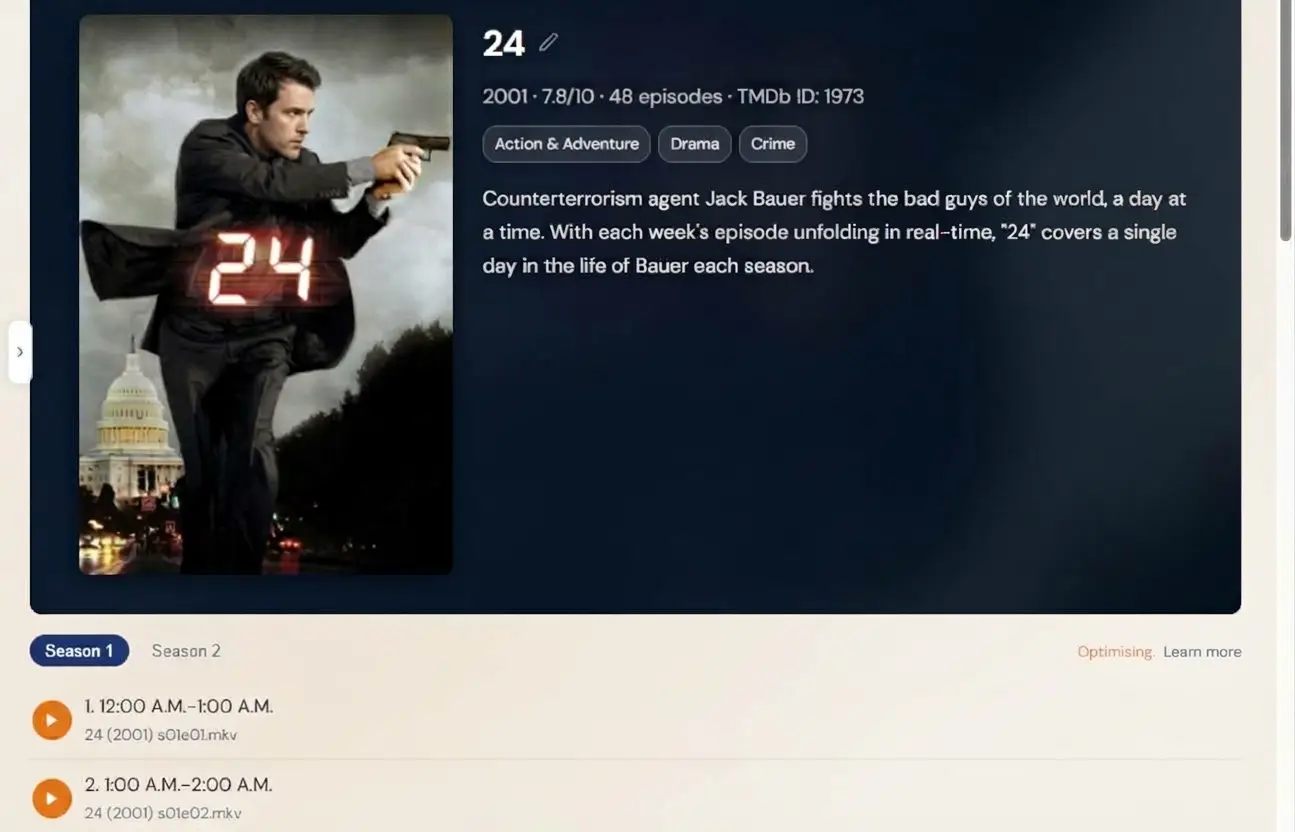
The app uses the folder name to find the series, then reads each episode file for its season and episode number to pull the right episode titles and descriptions.
Name the folder with the show and its year
Breaking Bad (2008)/
24 (2001)/
The Office (2005)/
Give every episode the S01E01 code
Breaking Bad (2008)/
    Breaking Bad S01E01.mkv
    Breaking Bad S01E02.mkv
Breaking Bad S02E01.mkv- The code can be written
S01E03or1x03— both are recognised. - Everything before the code is treated as the title, so extra text after it is fine.
- Keep episodes directly inside the series folder rather than in
Season 1/subfolders. The app scans the series folder to work out which seasons you have, and theS01E01code already tells it the season.
Like films, each episode remembers your position, so you can stop and pick up exactly where you left off.
Help Make your library look great
Music
Albums, artwork and covers
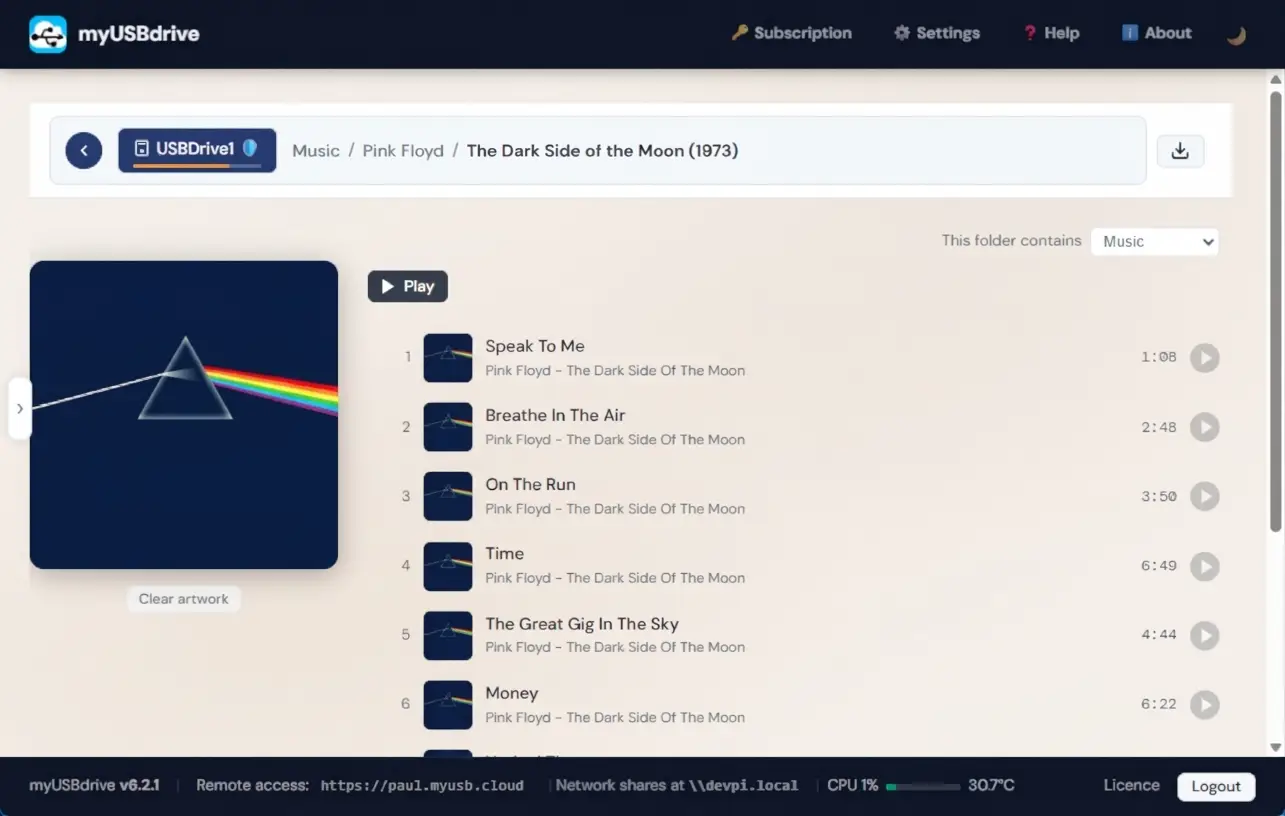
Album artwork is chosen in this order:
- A
cover.jpg(orcover.png) in the folder — this always wins, and overrides any artwork embedded in the files. Drop one in when you want a specific cover. - Artwork embedded in the tracks — the picture saved inside your MP3 or FLAC files, used automatically whenever there's no
cover.jpg. - An online lookup — the last resort, matching your folder names against an online music database when nothing else is available.
Best folder structure: artist, then album
Music/
    Pink Floyd/
        The Dark Side of the Moon/
            01 Speak to Me.mp3
        Wish You Were Here/
The album folder name is the album, and the parent folder is the artist. Simple and reliable.
Or a single folder with a dash
Pink Floyd - Pulse/Artist - Album, with spaces around the dash, is split automatically.
Extra text the app ignores for you
You can leave these in folder names and the lookup still works: (Disc 1), CD1, (1973), (Deluxe Edition), (Remastered), (Bonus Track Version), (Expanded Edition), (50th Anniversary), [FLAC], [MP3 320], [Lossless].
Avoid generic artist folders. Words like music, songs, audio, mp3, media and albums are ignored as artist names, so nest the real artist folder inside them.
Good tags mean clean albums
The app reads the Artist and Album tags inside your files. When every track shares the same artist and album, you get one tidy album cover. When a folder mixes different albums — a "Best of the 80s", say — and the tracks carry their own embedded artwork, the app automatically builds a mosaic cover from up to four of those covers, so the folder still looks the part.
Artist / Album, make sure the tracks are tagged, and drop a cover.jpg in the folder. Done.How your music plays back
Gapless playback keeps live albums and mixes flowing with no silent gap between tracks. It's available on Windows, Mac, Linux and Android. Apple's iPhone and iPad don't currently support it, which is a limitation of the browser rather than of myUSBdrive.
It remembers where you were. If you close the app partway through an album, it picks up from the last track you were playing when you come back.
Controls where you expect them. Play, pause and skip work from your Bluetooth headphones and steering-wheel buttons, and your music appears in Android Auto and Apple CarPlay with the track name and cover art on the car's screen.
Supported audio: mp3, flac, wav, ogg, m4a, aac, opus, wma.
Double and multi-disc albums
Put every track from every disc into a single album folder — there's no need for CD1 / CD2 subfolders. myUSBdrive reads the disc and track numbers from your files and sorts everything into the right order with disc headings automatically.
Not showing as a music player?
The music player view only appears when a folder contains only music files. Extra files like .cue, .log, .txt or stray cover images can switch it back to a plain file browser. Move those extra files out of the album folder to get the music player back.
cover.jpg always wins if the online lookup can't find a match — see the artwork order above.Help Make your library look great
Photos
Folders by year and event
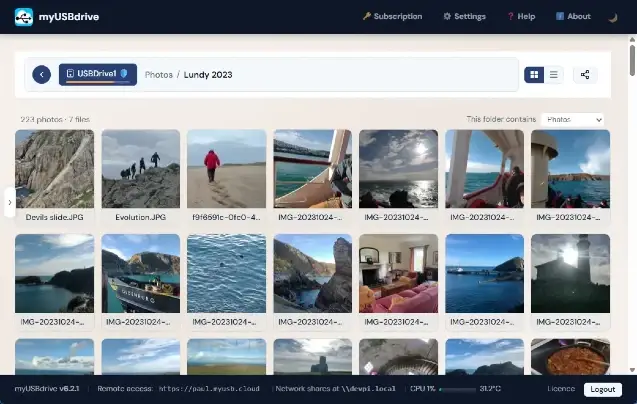
Photos are organised entirely by your folder structure. There's no online lookup — the app simply makes thumbnails and turns portrait phone photos the right way up on its own.
Year, then event, dated so it sorts itself
Photos/
    2024/
        2024-06 Cornwall Holiday/
        2024-08 Emma's Wedding/
        2024-12 Christmas/
    2025/
        2025-04 Lake District/
Why put the date first: folders sort alphabetically, so a YYYY-MM prefix keeps everything in the right order automatically. For a single day, use YYYY-MM-DD Event.
- Keep events in their own subfolders rather than one giant folder — faster to browse, with nicer thumbnails.
- No need to pre-rotate anything; the app straightens phone photos for you.
Share a photo album with friends and family
Once a folder is set to Photos, a Share button appears in the toolbar. It creates a private link that anyone can open in their browser — no app and no account needed. Sharing works through your remote access, so it needs an active subscription.
- Open the album and click Share.
- Choose when the link expires: 1 week, Single view (works once, then stops), or No expiry.
- Copy the link and send it however you like — message, email, anywhere.
You stay in control: revoke a link at any time from Settings and it stops working straight away.
Help Watch and listen
Watch on your TV
Cast to a Chromecast or AirPlay TV
Play a film, TV episode or home video from myUSBdrive on your TV, and use your phone or computer as the remote.
What you need
- A TV with Chromecast built in, or a Chromecast plugged into your TV.
- The TV on the same Wi-Fi as myUSBdrive.
- Open your myUSBdrive on your phone, tablet or computer.
Play a film on your TV
- Start the film playing.
- Click TV at the top of the player. myUSBdrive looks for TVs for a few seconds.
- Choose your TV from the list.
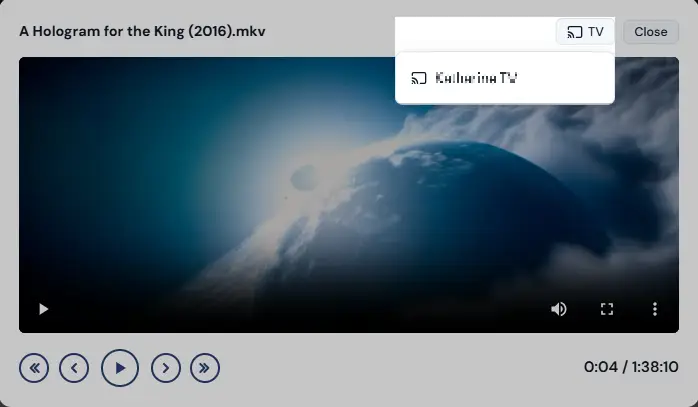
The film starts playing on the TV.
Your phone becomes the remote
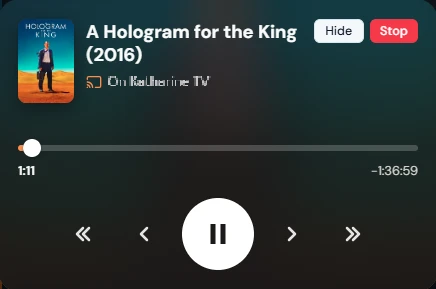
- Play and pause with the big button.
- Skip back or forward 1 minute with the single arrows, or 10 minutes with the double arrows.
- Drag along the bar to jump to any point.
- Hide keeps the film playing and shows a small bar at the bottom of the page, so you can carry on browsing. Tap the bar to bring the remote back.
- Stop ends the film on the TV.
AirPlay on iPhone, iPad and Mac
In Safari at home, an AirPlay button appears next to TV. Use it to play on an Apple TV or a TV with AirPlay. AirPlay works on your home network only.
TV not in the list?
- Check the TV is switched on.
- Check it's on the same Wi-Fi as myUSBdrive. A guest network keeps devices apart, so connect the TV to your main network.
- Click Search again.
Help Watch and listen
Listen in your car
Music, podcasts and audiobooks over your car's Bluetooth
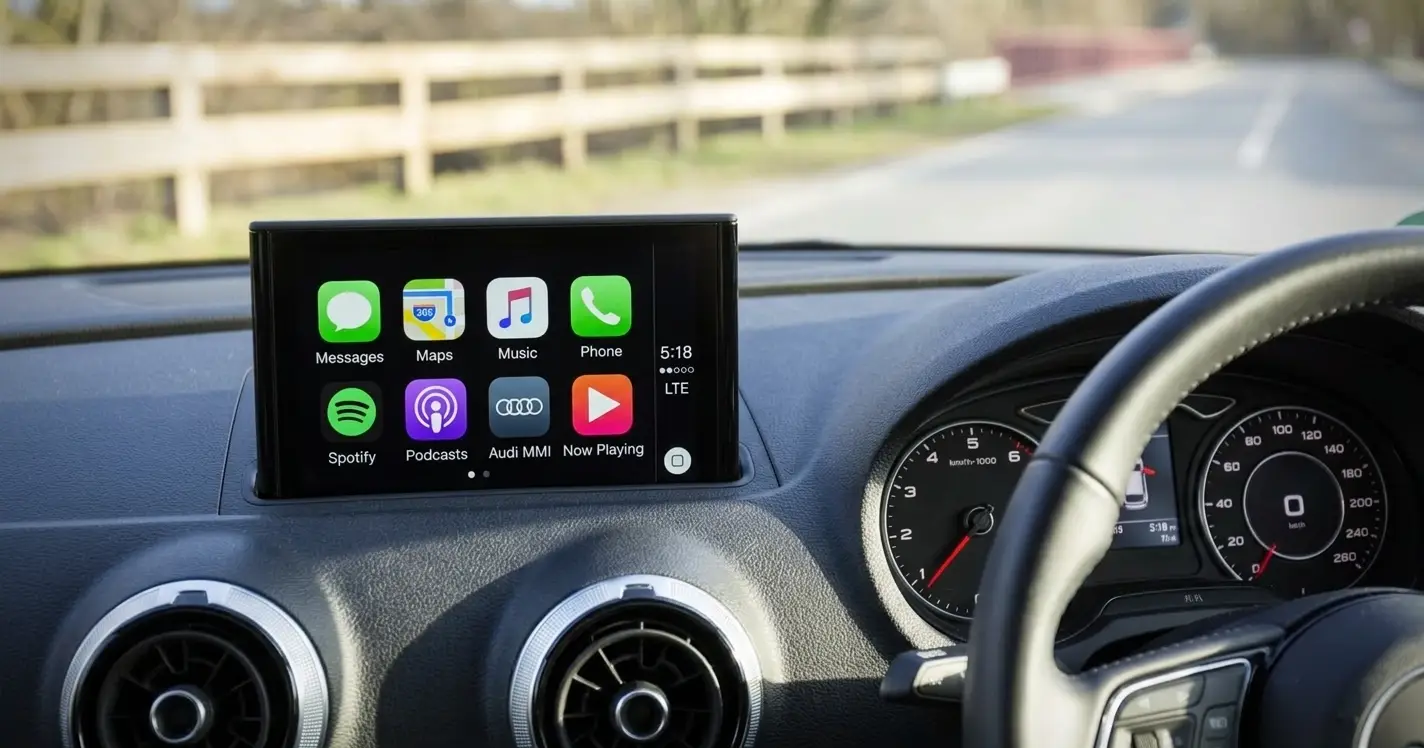
Play your music, podcasts and audiobooks from myUSBdrive through your car's speakers. Your phone streams the sound to the car over Bluetooth, and depending on your car, its screen may also show the album artwork, the title and the track.
yourname.myusb.cloud. myusb.local only works on your home network. See Accessing your files from anywhere.Start listening
- Connect your phone to the car's Bluetooth. If your car uses Apple CarPlay or Android Auto, that connects as usual.
- On your phone, open your myUSBdrive address and start an album, a podcast or an audiobook.
- The sound comes through the car's speakers. Depending on your car, its screen shows the album artwork, the title and the track.
Controls in the car
- Play and pause from the steering wheel or the car's screen, if your car has these buttons.
- Next and previous track when you're playing an album.
- Podcasts and audiobooks remember where you stopped, so on your next drive you carry on from the same place.
- You can lock your phone. The music keeps playing.
Good to know
- Listening uses your phone's mobile data.
- No signal, no music. In a tunnel or a dead spot the music stops until your phone is back online.
Help Keep your data safe
Check your USB drive every month
Every USB drive wears out in the end, and most show warning signs first. A quick check once a month spots those signs early, while your files are still easy to copy somewhere safe.
How to check a drive
- Open Settings and go to Drives.
- On the drive's card, click Check for errors.
- Click Run Check, and leave the drive plugged in until it finishes.
While the check runs, the drive is taken offline and comes back by itself when it's done, so close any files you have open on it first. The check only reads: it never changes, moves or deletes anything on your drive.
What it looks at
- The file system, the drive's index of where every file lives. A damaged index is the usual reason files go missing or a folder won't open.
- Read and connection errors the Pi has noticed, such as worn patches on the disk or a loose cable.
- The drive's own health report, if it keeps one. Many hard drives record how many worn-out areas they have. Some USB drives don't share this, and the check still covers everything else.
Reading the result
The drive's card shows the latest result and when it ran. Click Details to see everything the check found.
- No problems found: nothing to do until next month.
- Warnings detected: often something minor, such as the drive having been unplugged without ejecting it. Read the details, and make sure you have a recent copy of your files.
- Errors found: copy your important files to another drive now, then replace this one. Errors rarely get better on their own.
A reminder every month
If a drive hasn't been checked for a month, myUSBdrive reminds you, and the drive's card shows Monthly drive check recommended. You can turn the reminder off for that drive with the Remind me switch beside it.
Help Keep your data safe
Test your SD card before you install
A slow or undersized SD card is the most common reason a Raspberry Pi feels sluggish. Our free SD Card Check tells you in about a minute whether your card is big enough and fast enough for myUSBdrive, before you spend time installing.
For Windows 10 and Windows 11. A small ZIP file. Nothing to install and no administrator rights needed.
How to use it
- Put your SD card in your computer's card reader.
- Open the ZIP you downloaded: right-click it and choose Extract All, then Extract.
- In the extracted folder, double-click Start SD Check.cmd.
- Windows shows the warning below. Click Run.
- Choose your SD card from the list and click Check this card. The result appears after about a minute.
The warning you will see
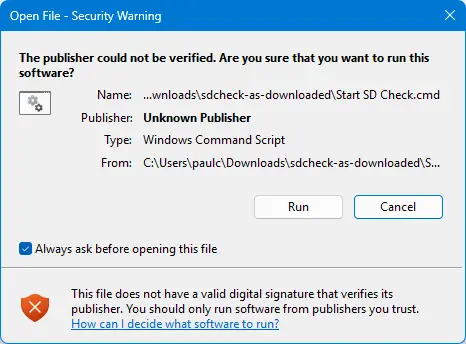
Windows shows this for any program that is not digitally signed by a registered publisher. It is expected, and you only see it because the file came from the internet. SD Card Check is a plain-text PowerShell script, so you can see exactly what it does: open sdcheck.ps1 in Notepad before you run it.
What it checks
- Size: myUSBdrive needs a card of 16 GB or larger.
- Write speed: how fast the card writes, against the same target myUSBdrive uses on the Raspberry Pi.
- Random write speed: how many small writes a second the card can handle, against the Raspberry Pi's target of 500. This is what myUSBdrive does all day, and a card can be fast at large files but very slow at this.
- Read-back: it reads its test file back and checks every byte is exactly what it wrote, so a card that quietly damages files is caught before you trust it with yours.
- Read speed: shown for information. It does not affect the result, because your card reader limits it.
- It does not test random reads: card readers on Windows handle one request at a time, which caps that result even for the fastest cards. After installing, myUSBdrive tests it properly from Settings, using the Raspberry Pi's own card slot.
What the result means
- Good for myUSBdrive: go ahead and install.
- This card will work, but it is slower than recommended: it writes within 10% of the recommended speed. myUSBdrive will run, but pages and uploads may feel sluggish at times. A card marked A1 or A2 fixes that.
- Too slow for myUSBdrive: it writes more than 10% below the recommended speed, so myUSBdrive would feel slow. Use a card marked A1 or A2. Before you replace it, try a USB 3 card reader if you have one: a slow reader can make a good card look slow.
- This card gave back different data from what was written: do not use it for myUSBdrive, because it would damage the files saved on it. A faulty card reader can cause this too, so try another reader before you replace the card.
- Too small for myUSBdrive: use a card of 16 GB or more.
What it does not do
- It does not delete, change or read your files. It writes one temporary 256 MB file and deletes it again, even if you cancel.
- It does not connect to the internet or send anything anywhere.
- It does not install anything.
Help Keep your data safe
Keeping your files safe with Drive Mirroring
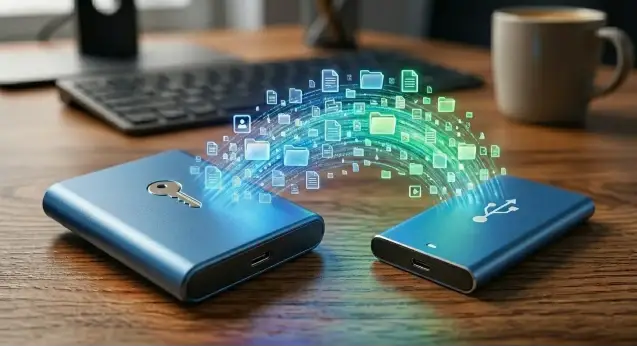
Drive mirroring keeps a complete, up-to-date copy of your main drive on a second USB drive. USB drives don't last forever, and if yours ever stops working, the mirror has an identical copy of every file ready to take over immediately.
Once set up, the mirror runs silently in the background. Any files you add, change or delete are automatically copied across within a few minutes. The mirror drive doesn't appear in the file browser — it sits quietly doing its job.
Setting up a local mirror drive
There's nothing to configure by hand. Plug a second, empty USB drive into your Raspberry Pi, and myUSBdrive detects it automatically and offers to protect your files with it — either as a pop-up prompt straight away, or as a card in Settings → Protect if you'd rather come back to it. Either way, tap Set up mirroring to confirm and it starts copying your files across immediately.
Setting up a remote mirror drive
A remote mirror keeps your backup on a different myUSBdrive somewhere else on your network, so a fire, a flood or a theft in one room doesn't take both copies with it. One Pi sends its files; the other holds the copy.
On the Pi that will hold the copy:
- Connect an empty USB drive. Everything on it will eventually be replaced by the other Pi's files.
- Open Settings and find the Protect your data card.
- Click Offer as remote mirror.
- The drive will disappear for a moment. This is meant to happen. Offering the drive unmounts it so it can be remounted as a private share rather than an ordinary drive.
- Click Detect Drive to bring it back. The card should then say Remote mirror active.
Then, on the Pi whose files you want backed up:
- Open Settings and find the Protect your data card.
- Click Mirror to another Pi.
- Choose the Pi that's offering its drive, and confirm.
The first sync starts straight away. From then on it runs quietly in the background, exactly like a local mirror.
Reconnecting a remote mirror
If you move the drive, rebuild a Pi, or the two simply lose sight of each other, the copy on the drive isn't lost. myUSBdrive leaves a small marker on the drive recording which Pi it belongs to and when it was last updated.
Plug the drive back into the Pi that was holding it and open Settings. The Remote Mirror card will tell you whose files are on the drive and when they were last synced. Click Offer as remote mirror, then Detect Drive as before. The other Pi reconnects on its own and picks up where it left off, without copying everything again.
How long does the first sync take?
The first time you enable mirroring, everything on your main drive gets copied across. How long this takes depends on how much data you have and which Pi you're using.
- Raspberry Pi 3: all four USB ports are the older, slower type, and the Pi 3 can't reliably power two drives at once from its USB ports, so at least one drive should have its own mains power supply. Expect around 15–20 MB/s — a 500 GB drive takes roughly 7–9 hours.
- Raspberry Pi 4: plug your main drive into a blue USB port and the mirror into a black one; using two blue ports at once can sometimes cause problems. Speed is similar to the Pi 3, around 7–9 hours for 500 GB.
- Raspberry Pi 5: use a 27W USB-C power supply and both USB ports work reliably together. The sync is noticeably faster than on older models.
You can carry on using your drives as normal while the first sync runs. Progress is shown in Settings → Protect.
Removing the mirror drive safely
Please don't just unplug the mirror drive — this can scramble the data on it. Here's the right way to do it:
- Open Settings and find the Protect card.
- Tap Disable mirroring and confirm.
- Wait for the status to update — the mirror drive reappears as a normal drive.
- Tap Eject on that drive, then unplug it.
What if my main drive fails?
Simply move the mirror drive across to replace it. Plug it into the same USB port and you're back up and running with all your files intact. If you were using a remote mirror on another Pi, disconnect the mirror drive from that Pi and plug it into yours instead.
Want to start mirroring again later?
If you turn mirroring off, the mirror drive reappears as a normal drive with all your backed-up files still on it — browse and access those files just like any other drive. Reconnect the same mirror drive later and myUSBdrive picks up where it left off without copying everything again. To set up a completely new mirror from scratch, you'll need an empty drive.
Help Keep your data safe
Move your backup to a safe location
A mirror drive protects you if your USB drive fails. For better protection, mirror your files to another myUSBdrive in a separate, safe place in your home, such as another room or an outbuilding on your network. Then a fire, flood or burglary in one room doesn't take both copies.
If you already have a mirror running, you don't need to start again. Move the drive to a second myUSBdrive and it carries on from where it left off, because every file is already on it.
What you need
- Two myUSBdrive devices on the same network.
- A subscription on the device whose files are being backed up.
- The mirror drive you already have, fully synced.
On the device that has the mirror now
- Open Settings and find the Protect your data card.
- Turn mirroring off. Your files stay exactly where they are on the drive.
- Eject the drive, then unplug it.
On the device that will hold the copy
- Plug the drive in, and press Detect Drive if it doesn't appear on its own.
- Open Settings, find the Protect your data card, and click Offer as remote mirror.
- The drive disappears for a moment. This is meant to happen. Offering it swaps it from an ordinary shared drive to a private one only the other device can reach.
- Click Detect Drive to bring it back. The card should now say Remote mirror active.
Back on the first device
- Open Settings and find the Protect your data card.
- Click Mirror to another Pi.
- Choose the device that's offering the drive, and confirm.
What to expect
The first sync finishes in moments rather than hours. Your device checks what's already on the drive, finds it all there, and sends only what has changed since you turned mirroring off. Nothing travels across your network that doesn't need to.
From then on it behaves exactly like the mirror you had before, running quietly in the background, except the copy now lives somewhere else in the house.
Help Keep your data safe
Moving to a new Raspberry Pi
If you want to upgrade to a newer Pi or replace one that's stopped working, you can simply take the SD card out of the old Pi and put it into the new one. Everything on the card — your settings, files, passwords and configuration — comes with it.
What works straight away
Your USB drives, file browser, music player, video streaming, network shares and recycle bin will all work exactly as before. If you had drive mirroring set up, that will continue running too. Your device name, Wi-Fi settings, and everything else stored on the SD card carries over automatically.
What you'll need to set up again
- Re-activate your device — your subscription is linked to the specific Pi it was set up on. After moving to a new Pi, go to the Subscription page and activate again. Your existing subscription transfers to the new device.
- Re-set up two-factor authentication — if you had this enabled, you'll need to set it up again in Settings → Security from your local network.
- Re-add remote network shares — if you had any remote shares configured (connections to other computers or NAS devices), you'll need to add them again with their passwords. The saved passwords are encrypted in a way that only works on the original Pi, so they can't be read on a different one.
Help Reach your files
Accessing your files from anywhere
With a subscription, you get your own personal address — something like yourname.myusb.cloud — that lets you reach your files from any device, anywhere in the world.
After you set up remote access, your address might not work straight away. That's completely normal — it can take anywhere from a few minutes to a couple of hours to become active. In the meantime, your home address keeps working as usual:
http://myusb.localThat's the default name. If you renamed your device (for example to "myfiles" or "backup"), use that name instead, like http://myfiles.local.
When you're connected remotely, downloading or uploading files requires two-factor authentication, and a few options are hidden for your security, such as ejecting drives and renaming the device. You can still browse, stream and download everything as normal.
Help Reach your files
Give your myUSBdrive its own name
Every myUSBdrive starts out called myusb, so you open it at http://myusb.local. Give it a name of your own and that becomes its address: call it myfiles and you open it at http://myfiles.local. Well worth doing as soon as you have more than one.
To rename it
- Open your myUSBdrive and go to Settings.
- Under Rename Device, type the new name and click Rename.
- It restarts. After about a minute, open it at its new address, like
http://myfiles.local.
Choosing a name: lowercase letters, numbers and hyphens, up to 63 characters, such as myfiles or myusb-bedroom. No spaces, and no hyphen at the start or end.
Good to know
- Your files and settings stay exactly as they were.
- Your remote access address (yourname.myusb.cloud) doesn't change.
- Update any bookmarks that use the old name.
- If your computer opens the drive as a network folder, it may still remember the old name. See Folder stopped working after a rename?
- Renaming while you're away from home asks for your two-factor code first.
Help Reach your files
Give your myUSBdrive a fixed IP address
myUSBdrive doesn't need a fixed address. Your devices find it by name, at http://myusb.local, and remote access doesn't use your home address at all. But if you open it by its IP address, for example on an Android phone, which can't open .local addresses, a fixed address stops your bookmark breaking when the router hands out a new one, such as after a power cut.
The easiest way: reserve the address on your router
- Sign in to your router's settings page. Its address and password are usually on a sticker on the router.
- Find the list of connected devices. Your myUSBdrive is called myusb, or the name you gave it.
- Look for address reservation, DHCP reservation or static lease, and reserve the address it has now.
Nothing changes on the Pi, and if you ever replace your router there's nothing to undo.
Or set it on the Pi with nmtui
If your router can't reserve addresses, set the address on the Pi itself, using its network settings tool, nmtui. You'll need to sign in to the Pi: plug a keyboard and a monitor or TV into it (Pi 4 and Pi 5 need a micro-HDMI cable), or connect from a computer over SSH.
- Find your router's address. Type
ip route | grep defaultand look for the number after via, such as192.168.0.1. - Type
sudo nmtui. - Choose Edit a connection, then the connection the Pi uses: Wired connection 1 for a network cable, or the name of your Wi-Fi.
- Next to IPv4 CONFIGURATION, change Automatic to Manual, then choose Show.
- Fill in your own numbers, keeping the first three parts the same as your router's:
- Addresses:
192.168.0.50/24 - Gateway: your router,
192.168.0.1 - DNS servers: your router again,
192.168.0.1
- Addresses:
- Choose OK, then Back, then Quit.
- Restart the Pi with
sudo reboot. After about a minute, open it at its new address, likehttp://192.168.0.50.
Connected over SSH? The connection drops when the address changes. Connect again using the new address.
To check it worked, sign in again and type ip -4 addr show. Your new address is listed next to inet.
Good to know
- Your files, myusb.local and remote access all carry on exactly as before.
- An address set on the Pi stays with it. If you move it to a network that uses different numbers, such as 192.168.1.x instead of 192.168.0.x, you won't be able to reach it. Plug in a keyboard and screen, run
sudo nmtuiand set IPv4 back to Automatic.
Help Reach your files
Uploading files, and why some are held for review
You can add files to your drive through the web dashboard as well as over your network shares. On your home network you can upload freely. When you're away from home and connected through your myusb.cloud address, uploading also asks for your two-factor authentication code, so a stolen password alone can't add files to your drive.
To keep the computers and phones in your household safe, myUSBdrive holds back a few higher-risk file types when they're uploaded, and puts them in a quarantine area until you approve them. These are the sorts of files that could harm a Windows or Mac device if opened without thinking, such as:
- Archives that might contain hidden programs (
.zip,.rar,.7z,.iso) - Programs and installers (
.exe,.msi,.app) - Scripts and shortcuts (
.bat,.cmd,.ps1,.sh,.vbs,.lnk) - Office documents that can run macros (
.docm,.xlsm,.pptm)
When something is quarantined, you'll see a notification that files are waiting for approval. Nothing is deleted: your file is safely set aside, and you decide whether to approve it (which moves it into your folder as normal) or remove it. Everyday files like photos, videos, music and documents are never quarantined and upload straight away.
Help Reach your files
Your subscription is active but your device isn't connected
If your myUSBdrive shows an amber message saying your subscription is active but this device is not connected to it, nothing has gone wrong with your payment and nothing has been lost. Your files are all still on your USB drive, and everything on your home network carries on working as normal. The only thing affected is remote access: your personal address at myusb.cloud won't load until your drive and your subscription are introduced to each other again.
This usually happens after the SD card has been rebuilt, a backup has been restored, or the device has been reset.
The quick way, on the same Pi
This keeps your existing web address, and nothing is deleted.
- Sign in at dashboard.myusb.cloud and find the card for this device.
- Click Activation token. A fresh token appears for about 30 seconds and then hides itself again, because it's a credential. Click Copy while it's showing.
- On your home network, open your drive at
http://myusb.local/subscription. If you renamed your device, use that name instead, likehttp://myfiles.local/subscription. - On the Your Subscription card, paste the token into the box marked Paste your provisioning token here. Your account page calls it an activation token and your drive calls it a provisioning token. They're the same thing. You're reconnecting to the subscription you already have, not buying another.
- Click Activate. Your address is usually working again within about half a minute.
"Already covered" isn't an error
Clicking "Manage or cancel this subscription" takes you to your billing page, which may say "your device is already covered" or "This device already has an active subscription." That's good news rather than a fault. It means the subscription is still attached to this drive, and the page is stopping you buying a second one you don't need. There's nothing to fix there. Go back to the device card and use the Activation token button described above.
The token in your setup email
The email headed "Your myUSBcloud activation token" contains one, and it works perfectly well if it has never been used. Each token can only be used once, so if your drive has been activated before, that one has already been spent, and pasting it gives you "Token already activated on another device." Tokens also carry an expiry date. In both cases the answer is the same: create a fresh one from your account page.
A genuinely new Raspberry Pi
If you're moving to different hardware rather than reconnecting the same drive, the easiest route is usually to move the SD card across, which brings everything with it. See Moving to a new Raspberry Pi below.
If you do need to move the subscription itself, use Move subscription to a new device on the device card on your account page. Worth knowing before you click it: the old device is disconnected straight away, and its connection and its address stop working immediately. When you activate the new Pi, choose the same website address and your URL carries on unchanged.
Help Fix a problem
Can't open myusb.local?
myusb.local is how your computer or phone finds your myUSBdrive by name, so you never need to know its number. If it opens on one device in your home, your network is fine, and every name works, including a new one you give your drive. If it won't open, start here.
First, the quick checks
- Give it a few minutes. The very first start takes a few minutes, because it sets itself up and restarts once. After a restart or a rename, allow a minute.
- Type it in full:
http://myusb.local. Without the http:// some browsers search the web instead. - Same Wi-Fi. Your phone or computer must be on the same network as your Pi: not the guest Wi-Fi, and not mobile data.
- Renamed it? Use the new name, like
http://myfiles.local. (How renaming works) - Two new myUSBdrives? Both start out called myusb, so the second one answers at
http://myusb-2.local. Rename the first one before you switch on the second.
Try another device
Open http://myusb.local on a second computer or phone. If it works there, your drive and your network are fine, and the first device needs a setting changed (below). If it fails everywhere, jump to If it fails on every device.
Windows
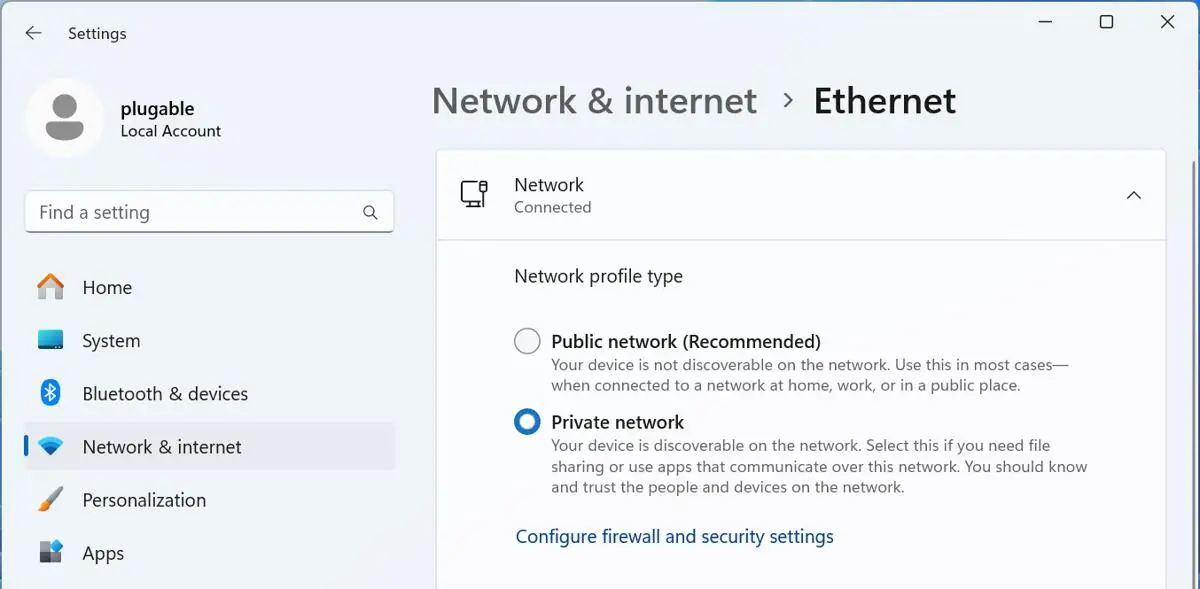
- Set your network to Private: Settings, Network & internet, Wi-Fi (or Ethernet), your network, then choose Private network, even though Windows marks Public as recommended. Windows only finds .local names on a private network, and an update or a VPN can quietly switch it back to Public.
- Switch off any VPN while you're at home.
- Security software with its own firewall (Norton, McAfee and similar): mark your home network as trusted.
- A work laptop? Its IT department may have switched this off. Use the IP address instead (below).
Mac, iPhone and iPad
These find .local names by themselves. If it won't open, switch off any VPN and check you're on your home Wi-Fi rather than a Personal Hotspot.
Linux
Desktop versions of Ubuntu and most other Linux systems find .local names by themselves. If you've switched on a firewall, allow mDNS (UDP port 5353).
Android
Android phones and tablets can't open .local addresses. That's a limitation of Android, not of your network or your drive. Use your drive's IP address instead (below). The easiest way to find it from the phone itself is a free network discovery app, such as Bonjour Browser from the Play Store: open it and look for myUSBdrive on myusb. With a remote access subscription, your own address (yourname.myusb.cloud) also works on Android, at home and away.
If it fails on every device
- Power and SD card. A weak power supply or a slow or worn SD card can make the Pi restart over and over. Use the official Raspberry Pi power supply, and see Test your SD card before you install.
- Restart the Pi. It often clears it.
Use the IP address instead
The IP address works on every device on your home network, Android included. Find it any of these ways:
- On a computer where myusb.local opens: Settings shows the IP address.
- On your phone: a network discovery app (see Android, above).
- Your router's list of connected devices, where your drive is called myusb (or the name you gave it).
- Plug a monitor or TV into the Pi (Pi 4 and Pi 5 need a micro-HDMI cable). Look for the line My IP address is 192.168… and use just that first number. Ignore a line that says 127.0.1.1, and anything after the space.
Then type it like this: http://192.168.0.51 (with your own number), and bookmark it or add it to your home screen.
Help Fix a problem
Forgotten your app password?
Your files are safe. Forgetting passwords happens, and it's straightforward to put right. Nothing on your USB drive is lost, and nothing on it needs to change. If you ticked Remember me for 30 days when you signed in, your browser has been signing you in ever since. Each visit starts the 30 days again, so if you use myUSBdrive regularly you may not have typed the password for months. Then a new phone, a new browser or clearing your history asks for it, and it has gone. That's the tick box doing its job. You haven't done anything wrong.
Why the answer is a fresh SD card
There's no "email me a reset link" for this password, and that's deliberate. The password lives only on your Raspberry Pi, not with us, so nobody can reset it from outside your home. Only someone holding the SD card can start again, and that's you.
Starting again means writing a fresh copy of myUSBdrive onto the SD card, exactly as you did when you first set it up. Allow about half an hour, most of it waiting for the card to be written.
Step by step
- Note your device name. If you renamed your device, write the name down. It's the part before
.localin your browser's address bar, for examplemyfilesinmyfiles.local. You'll put it back later so everything finds your device again. - Switch off, and unplug the USB drive. Unplug the power from the Pi, then unplug your USB drive and put it safely to one side.
- Write a fresh SD card. Take the SD card out of the Pi and follow Part 1 of our installation guide to write myUSBdrive onto it.
- Start up and choose a new password. Put the card back in the Pi, switch it on and follow Part 2 of the installation guide: open
http://myusb.local, accept the licence and choose your new password. This time, let your browser save it when it offers. - Plug your USB drive back in and click Detect Drives. Your files appear just as they were.
Put your device name back
Your fresh card starts with the name myusb. If you'd renamed your device, open Settings, find Rename Device, type the name you noted in step 1 and click Rename. The Pi restarts, and after about a minute it's back at its old address, for example http://myfiles.local, so your bookmarks work again.
Your computer may still be holding the old password for the shared folder, because the network share uses the same password as the app. If the folder won't open, remove the old saved password as shown in Opening your files from your computer, under "Folder stopped working after a rename?", then connect again with your new password.
Reconnect your subscription
If you pay for remote access, your subscription is still there and still paid for. It just needs introducing to the fresh card, and there's nothing to buy.
- Sign in at dashboard.myusb.cloud, find the card for this device and click Activation token. Click Copy while the token is showing.
- On your home network, browse to your device and click Subscription in the menu.
- Paste the token into the box at the bottom of the page and click Activate.
Your web address stays the same, and it's usually working again within about half a minute. There's more detail in Your subscription is active but your device isn't connected.
What else to switch back on
A few settings live on the SD card, so the fresh card starts without them. Your files are not affected by any of these.
- Drive Mirroring: switch it on again in Settings. See Keeping your files safe with Drive Mirroring.
- Connections to other computers or a NAS: add them again with their passwords.
- Two-factor authentication: once your subscription is reconnected, check it's on in Settings → Security, and set it up again if it isn't.
Help Fix a problem
Drive not showing up?
This is usually easy to sort out. Here's what to try:
- Give it up to 30 seconds after plugging in — the Pi needs a moment to recognise and set up the drive.
- Try restarting with the drive already plugged in (Settings → Reboot).
- Make sure the drive has been formatted. NTFS, exFAT and FAT32 are all supported. If it's a brand new drive that's never been used, you may need to format it on a PC first.
- Using a Pi 3, or connecting two drives at once? Drives that draw all their power from the USB port can struggle. A drive with its own mains power supply is much more reliable, especially on older Pi models.
Can't save files to the drive?
- Check there's no write-protect switch on the drive itself — some portable drives have one on the side.
- If the drive was unplugged from a Windows PC without ejecting it properly first, it might have been set to read-only as a precaution. Eject it from the myUSBdrive dashboard, plug it into a Windows PC, and let Windows check it for errors. Once that's done, plug it back into the Pi.
Can't eject the drive?
This usually means something else is still using it. Try these steps:
- Close any files you have open on that drive from other computers.
- If another device has the shared folder open, close that connection too.
- Wait a minute and try again — sometimes a background task just needs a moment to finish.
Help Fix a problem
Why won't my video play?
Most videos play straight away, but some older formats can't play directly in a web browser. When myUSBdrive spots one of these, it shows an orange play button so you can convert it on the fly.
Videos that play without any issues
- MP4 files — the most common format, works everywhere.
- WebM files.
- Most H.265 (HEVC) files in an MP4 container.
Videos that may need converting
- Files with surround sound audio (very common in DVD and Blu-ray rips) — browsers can't play these directly.
- AVI, WMV and FLV files — older formats that modern browsers don't support.
- Files using older video formats like MPEG-4 Part 2 or WMV video.
What the orange button does
Tapping the orange button converts the video as it plays — you don't have to wait for anything to finish first. The audio is converted to standard stereo and the video is adjusted if needed. It all happens live on the Pi, so you might notice a brief pause at the start, especially on older models.
Want a permanent fix?
If you find yourself tapping the orange button a lot, it's worth converting those files once and for all using a free tool called HandBrake. Converted files will play instantly on any device without any extra steps. A good starting point is the "Fast 1080p30" preset.
Help Fix a problem
Cloudflare Error 1033: your address won't load
A Cloudflare error page showing Error 1033 means your address is real and still points at your drive, but Cloudflare couldn't reach the drive at that moment. It's a connection problem rather than anything to do with your files, which stay safely on your USB drive throughout. While you sort it out, your drive carries on working normally on your home network:
http://myusb.localHere are the reasons it happens, with the most likely first.
- You've only just activated. A new address takes a few minutes to come alive, and occasionally up to an hour. This is by far the most common cause, and it sorts itself out.
- The Pi is off, asleep, rebooting or off the network. Check you can reach it at
http://myusb.localfrom home. If you can't, the drive itself is the thing to look at rather than the address. - The drive has lost its connection credentials. After an SD card rebuild, a restored backup or a reset, a drive can keep its subscription but lose the file that connects it. The Subscription page says so in amber. See Your subscription is active but your device isn't connected above.
- "Move subscription to a new device" was clicked. That deliberately takes the old connection down, so the old address stops immediately. Activating the new Pi with the same address brings it back.
- The connection service has stopped. Rare, but it happens. Restart the drive from Settings, give it a minute, then try your address again.
- The subscription has ended, been cancelled or been refunded. Remote access stops at the end of the period you've paid for. Your address is then held for 15 days in case you come back, and released after that.
- The 15 day hold has run out. Once your address is released the name goes back into the pool and somebody else may take it. You can subscribe again and choose a new address, or the same one if it's still free.
- Your own network or browser is remembering an old answer. If your address works on mobile data but not on your home Wi-Fi, this is why. Try a different browser or device, and it usually clears within the hour.